CT Raid Group/Strategy
Jump to navigation
Jump to search
Team strategies that are continuously tailored for our team. These do not necessarily represent general strategies that can be applied to other raid teams.
| Introduction | Strategy | Progression |
ICC
Lower Spire
Lord Marrowgar
Abilities
- Coldflame - targets a random person and shoots blue fire directly at them. Strafe to avoid this. 6k dmg per sec for 3 sec
- Bone slice - Cleave ability in front of marrowgar. Solved by tanks on top of each other
- Bone Spike - 9000 dmg, and 10% health dmg each second thereafter - DPS should immediately kill these
- Ranged priority is getting people out of the spike, melee helps if it's in proximity
- VENT: Call out bone spikes
- Bone Storm - marrowgar runs around the room - stop dps and avoid the fire
Strategy
Lady Deathwhisper
Abilities
- Phase 1 - Mana Shield (3.3M)
- Waves of adds spawn from one side of the room (∆ on each iteration)
- Melee on dresses, Ranged on melee
- Death and Decay 4500 shadow dmg every second to all around the player -- that person should run AWAY from raid VENT: call out name
- Reanimated should
- Phase 2 - Burn her
- Watch out for Vengeful shades - they chase random people and despawn after a few seconds. RUN AWAY FROM THEM
- Melee should try to interrupt her frostbolts - they hurt
- Tanks will trade off agro after 3 stacks.
Gunship Battle
Deathbringer Saurfang
Plagueworks
Precious
Stinky
Rotface
Festergut
Professor Putricide
The Crimson Hall
Blood Prince Council
Blood Queen Lana'thel
The Frostwing Halls
Valithria Dreamwalker
Sindragosa
Tail and Frontal Cone (like all dragons)
Abilities
- Ground Phase 60 seconds
- 3k dmg per 3 seconds from frost aura
- Melee gives you 20% chance of getting "permeating chill" - 1000 dmg per stack. RESET THIS @ a 3-4 stacks
- Unchained magic - 30 sec debuff on random caster
- every time spell is cast you get instability - after 8 seconds of not casting you get 2k dmg per stack. Don't go more than 4 stacks
- Unmitigated dmg for tank is 30k and slows dmg. NEED a tank healer
- ICY GRIP pulls everyone towards her -- RUN AWAY .. you have 5 seconds to get 20 yds away before major dmg
- Air Phase 50 seconds
- First @ 85% health
- Two random targets get blue arrows - ICE TOMB encase. Move away from them (10 yards)
- Hide behind ice tombs to LoS her frost bolt -- direct from the blue circle on the floor
- FOUR ice shots
- We must destroy the ice tomb after the fourth to release raid members - not until then
- 35%
- Mystic Buffet - stacking debuff every 5 seconds - increase magic dmg tank. BAD for tank, big heals on MT
- Reset buffet with LoS behind frost tomb. When she marks someone for ice tomb, they run to a designated spot so everyone knows where to go to get rid of mystic buffet
- Reset stacks as soon as possible - tanks need to communicate to switch
Team
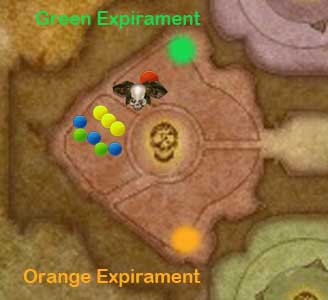
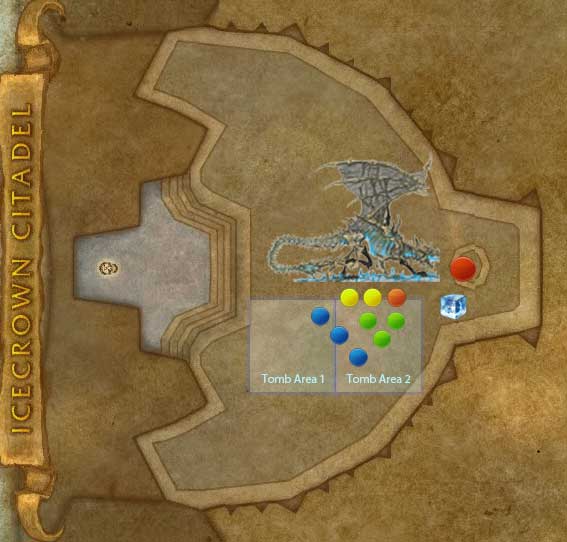
Heals: (green dots)
- One dedicated healer for tank. Other two healers will be focused on the raid.
MT: (red dot)
- Positions Sindragosa as the graphic shows below. OT should be ready to take over if MT dies OR if MT gets "chilled" in phase 3.
DPS: (blue for ranged, yellow for melee, orange for OT)
- Position yourself flanking Sindragosa along her south side.
Points of Failure
- Be mindful of tail swipe or frontal cone damage
- GET RID of Chilled to the Bone after 3 stacks. 5 wipes you, taxes healers (stop melee)
- GET RID of Unstable Magic after 3 stacks. 5 wipes you, taxes healers (stop casting)
- If you're "cold bombed" at the start of phase 2, run to the ice tomb area (blue haze on map)
- If you're not "cold bombed" then run to the outside edge of the ice tomb area
- Clear your debuff behind ice tombs!!! 4 stacks is bad for the raid
- Remember to break ice tombs, but don't kill them until the fourth shot in phase 2
- When you get sucked into her -- run away immediately!!!!
Phase Strategy
- For ground phase
- Maintain position flanking Sindragosa at max melee range (a bit further for casters)
- Be sure to manage your stacks by stopping casting and melee once you're at 3 or 4.
- When sucked into Sindragosa, immediately run away from her back to our flanked position. Avoid the head and tail - get 25 yards distance
- For air phase
- Those with blue arrows will become ice tombs. Stay 10 yards away from them. They will split up into the two ice tomb areas. Melee and Ranged will split behind the tombs to take it down and hide.
- While you're hiding from Sindragosa, destroy the ice tombs. Don't KILL them until the fourth shot is over
- Hide LoS behind tombs to avoid shot - it's a blue swirl on the ground
- For 35% phase (all ground)
- Chilled players get a blue arrow, and they will run to the "ice block" position on the map below. This is where players can go to remove their dmg debuff (mystic buffet) after it gets up to a few stacks - NO MORE THAN 4

